OJ Develops

Thoughts on software development. .NET | C# | Azure

Deploying a Web Application to Local IIS using Visual Studio 2017

05 October 2017

Deploying a Web Application to Local IIS using Visual Studio 2017 thumbnail

In this post we are going to see how to deploy a web application on your development machine. The end goal is to have a web application running on the development machine outside of the context of Visual Studio and which is accessible to other devices on a local network.

Install IIS

Before we get started, we need to make sure that IIS is installed on our machine. Here are the steps to do that in Windows 10:
  1. Open the search dialog by pressing WinKey + S or by clicking the magnifying glass icon.
  2. Type in “Turn Windows features on or off” and click on the matching result.
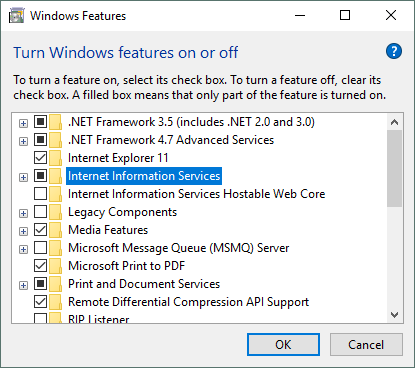
  3. You’ll see the “Windows Features” window (see sample image below), which has a list of folders with checkboxes beside them.
  4. Look for the folder “Internet Information Services” and make sure that the checkbox is filled with either a check or a black square. If it is, you’re good to go.
  5. If the checkbox is empty, check it and click OK. Windows will install IIS for you.

turn-windows-features-on-or-off

Deploying the Web Project

Now it’s time to deploy the web project. What will happen is that we will copy the files and folders that are necessary to run the solution to a separate folder that IIS knows about. After some configuration, IIS will take care of making the web application accessible even without Visual Studio.

There are two parts to the equation: first is setting up IIS, and second is publishing from Visual Studio.

Setting Up IIS

Here are the steps to set up IIS:

  1. Open the search dialog by pressing WinKey + S or by clicking the magnifying glass icon.
  2. Type in “Internet Information Services (IIS) Manager” and click on the matching result. If you don’t get any results, that is a sign that IIS has not been installed on your machine. See above for instructions.
  3. You’ll see the “Internet Information Services (IIS) Manager” window. There are plenty of items in this window but we don’t need them all.
  4. On the leftmost column, you’ll see a treeview that starts with your PC name. Expand that down if it isn’t already expanded.
  5. Right click on Sites > Add Website…
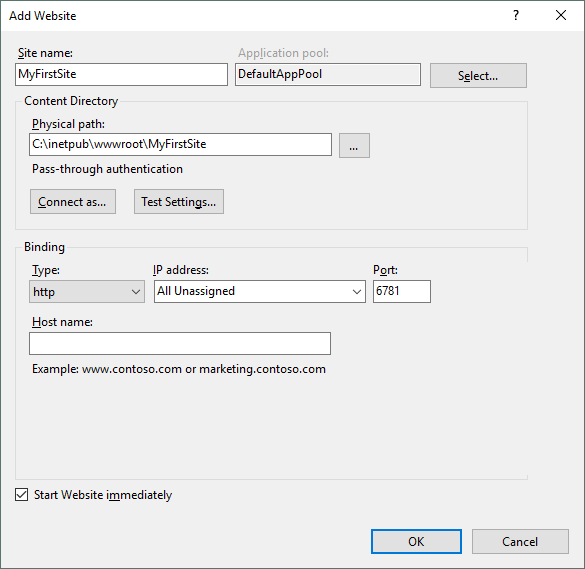
  6. The “Add Website” window comes up (see sample window below). Here is where we will configure our new site.
  7. Under “Site name”, enter something that would identify your site among all the other sites that you may host in IIS.
  8. Under “Application pool”, choose DefaultAppPool.
  9. Under “Physical path”, click on the three dots button beside the textbox, which will bring up the “Browse for Folder” window.
  10. You can select any folder, but IIS sites typically live inside the C: > inetpub > wwwroot folder. Let’s follow that convention.
  11. Search for the C: > inetpub > wwwroot folder. Click on the wwwroot folder, then click on the Make New Folder at the bottom left of the window. Name the new folder the same as the Site name. Click OK.
  12. Back at the “Add Website” window, in the Port textbox, optionally change the port number to something else. A 4-digit number is typically used.
  13. Click OK.

add-website

We are now ready from the IIS side of things. Next, we need to copy our project files over to the folder we just created. That can be done manually or through the Visual Studio publishing functionality.

Publishing from Visual Studio

Here are the steps to publish to IIS through Visual Studio:
  1. Run Visual Studio as an Administrator.
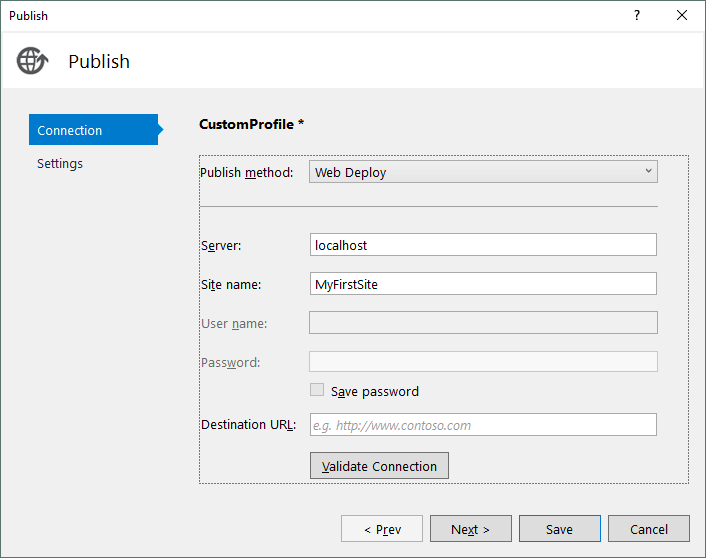
  2. Right click on the web project > Publish. Select the box “IIS, FTP, etc” and click Publish. The Publish window will appear (see sample window below).
  3. For the “Publish method”, choose “Web Deploy”.
  4. For the Server, type in “localhost”.
  5. For the “Site name”, type in the same site name you used during the IIS setup earlier.
  6. The “User name” and Password will be greyed out, which is expected if the server is localhost.
  7. Leave the “Destination URL” blank.
  8. Click Save. (No need to click Next, but you can do so if you want to see the additional options that are available to you.)
  9. Visual Studio will start a publish. You can see the progress in the Output window. The publishing is done if you see a Publish succeeded message in the Output Window or on the status bar.

visual-studio-publish

You can now browse to the site by opening a browser and typing http://localhost:[portNumber]/, where [portNumber] should be replaced by whatever port number you put in during IIS setup. If you did not change the port number, you can leave this blank.

The next time you Publish through Visual Studio, you will no longer see the setup window. Visual Studio will remember your settings and you can publish by clicking on the Publish button.

Common Errors and How to Solve Them

Here are some common IIS errors and how to solve them. I will update this list as I remember or encounter more errors:

HTTP Error 500.19 - Internal Server Error

Detail: The requested page cannot be accessed because the related configuration data for the page is invalid.

Look at the config error and follow the appropriate solution:

Config error: This configuration section cannot be used at this path. This happens when the section is locked at a parent level. Locking is either by default (overrideModeDefault=”Deny”), or set explicitly by a location tag with overrideMode=”Deny” or the legacy allowOverride=”false”.

Solution: Open the “Turn Windows features on or off” window. Go to Internet Information Services > World Wide Web Services > Application Development Features. Check all except CGI and click OK.

Images, JavaScript files, CSS files cannot be found

A couple of things to look at here.

First, make sure that the image is included in the Visual Studio project before publishing. That is to say, that the image file is visible on Solution Explorer inside the appropriate folder. During development, the images will show just fine even if they’re not included in the Visual Studio project, as long as they exist on the file system. But during publishing, Visual Studio will only copy over files that are included in the project, and any images that are not part of the project will not get copied over.

Second, make sure that all references to images are relative paths, and not absolute paths.

Making the Web App Available Over the Network

Now we have a web app that can be accessed on a browser without Visual Studio. We can take this step further by making the web app available over our local network. This is useful in scenarios involving mobile development, where you want to see how your website looks on an actual mobile device or you want to test access of Web API calls.

Here are the steps to do that in Windows 10:
  1. Open the search dialog by pressing WinKey + S or by clicking the magnifying glass icon.
  2. Type in “Windows Firewall with Advanced Security” and click on the matching result.
  3. You will see the “Windows Firewall with Advanced Security” window. Like IIS, there are plenty of items in this window but we don’t need them all.
  4. On the leftmost column, click on “Inbound Rules”.
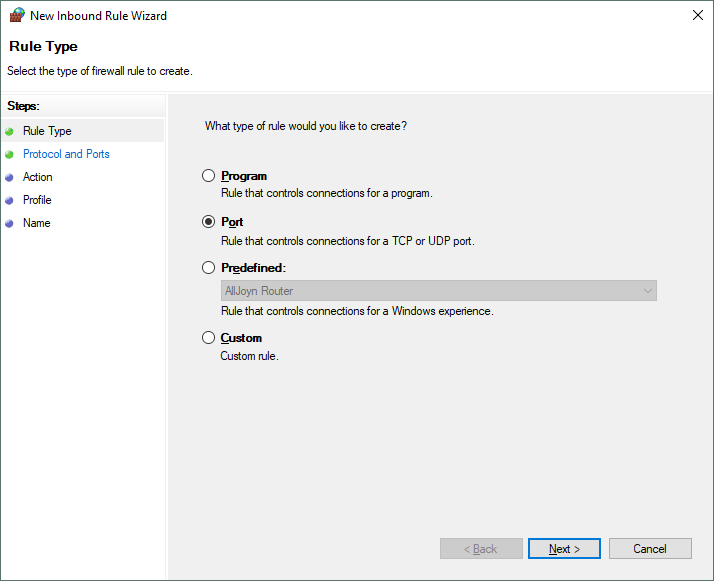
  5. On the rightmost column, click “New Rule…”. The “New Inbound Rule Wizard” window will appear (see sample window below).
  6. On the “Rule Type” step (the first step), click Port and click Next.
  7. On the “Protocols and Ports” step, choose TCP and choose “Specific local ports”. Type in the port of the website which you entered earlier in IIS. Click Next.
  8. On the Action step, choose “Allow the connection” and click Next.
  9. On the Profile step, choose at least Domain, Private, and Public then click Next.
  10. On the Name step, choose a descriptive name for this rule, and click Finish.

new-inbound-rule-wizard

At this point, the web app should be accessible over the network. On another network computer, open a browser and go to the address http://[hostIPAddress]:[portNumber], where [hostIPAddress] is the IP address of the computer hosting the application and [portNumber] is the port number you used during IIS setup.

To obtain the host computer’s IP address, open a command prompt on the host computer and type ipconfig. Look for the IPv4 address. There may be multiple IPv4 addresses; which one is correct depends on your network configuration.

Summary

In this post we looked at how to deploy a web application to your development machine. The operating system is Windows 10 and the Visual Studio version is 2017. The end goal was that we had a web app running standalone, meaning it could be accessed even if Visual Studio was closed. We also made the web app accessible from other devices on the same network.