27 September 2014

So you’ve created your entities and had Entity Framework create your database for you. Now, you want to change your entities and of course also change the database schema. How do you go about doing that?
You can, and I’ve done this lots of times. You know that Entity Framework can create the database for you if there is no database yet. So when you change your entities, you can delete the existing database, and when you run your application again, you would get a new database with a schema that corresponds to the updated entities.
While this works well during development, you can imagine that deleting and recreating the database is not very suitable for production!
Entity Framework uses a set of rules that determine the appropriate database schema that corresponds with your entities. If you know these rules, you would be able to manually update the database to mimic what Entity Framework would have done.
You can also imagine that this is not the best solution because just one mistake can cause errors. In addition, Entity Framework can already do this for you, so there’s no need for you to do this manually.
Today we will be using migrations to update the database schema. Specifically, we will be using Code First Migrations.
Here is a summary of the code first migration workflow:
Let’s see these steps in action.
Let’s create a console application, import the Entity Framework package, create an entity, create a context, and then insert an entity.
Here is a sample User entity:
public class User
{
    public int Id { get; set; }
    public string Name{ get; set; }
}
Here is the context:
public class MyContext : DbContext
{
    public DbSet<User> Users { get; set; }
}
Here is Program.cs:
public class Program
{
    static void Main()
    {
        try
        {
            using (var db = new MyContext())
            {
                db.Users.Add(new User
                {
                    Name = "Cowman"
                });
                db.SaveChanges();
            }
        }
        catch (Exception ex)
        {
            Console.WriteLine(ex.Message);
        }
    }
}
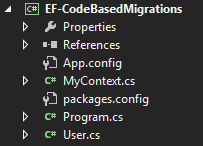
Here is a snapshot of the Solution Explorer window which shows the classes:

When you run the program, the database gets created and a User gets inserted, as expected.
To do this, type Enable-Migrations into the Package Manager Console and press enter, like so:

Note: The Default project should be the project where your context class is in.
Note 2: If you have multiple contexts, you need to specify on which context you would like to enable Migrations, using the following command:
Enable-Migrations -ContextTypeName [FullyQualifiedNameOfYourContextClass]
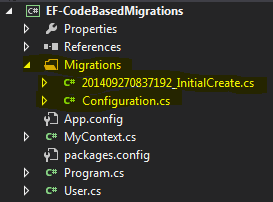
You may have noticed that after enabling migrations, a couple of new classes and a folder appeared in the project:

You can ignore the Configuration class for now. What’s interesting is the “InitialCreate” class - it serves as a snapshot of the state of your classes the first time Migrations was enabled.
Now add an Address field to the User entity:
public class User
{
    public int Id { get; set; }
    public string Name{ get; set; }
    public string Address { get; set; }
}
You will get an exception: “The model backing the ‘MyContext’ context has changed since the database was created. Consider using…” This is because there is a mismatch between the shape of your classes and the database schema. To move on, you need to do the next steps:
You can do this by executing the Add-Migration -Name [MigrationName] command in the Package Manager Console. [MigrationName] is an identifying name of this migration (eg AddAddressToUser):

Notice that another class was added to the Migrations folder:

At this point, Entity Framework has information about the initial state of the system and the new, target state of the system. Entity Framework can use this information to update the database schema accordingly. You can trigger this update manually by using the Update-Database command, again in the Package Manager Console:

Once the command finishes, the database schema would have been updated. Now, the shape of your classes and the database schema are in sync again, and you will no longer get any exceptions when you try to run the application.